Set up a new entity
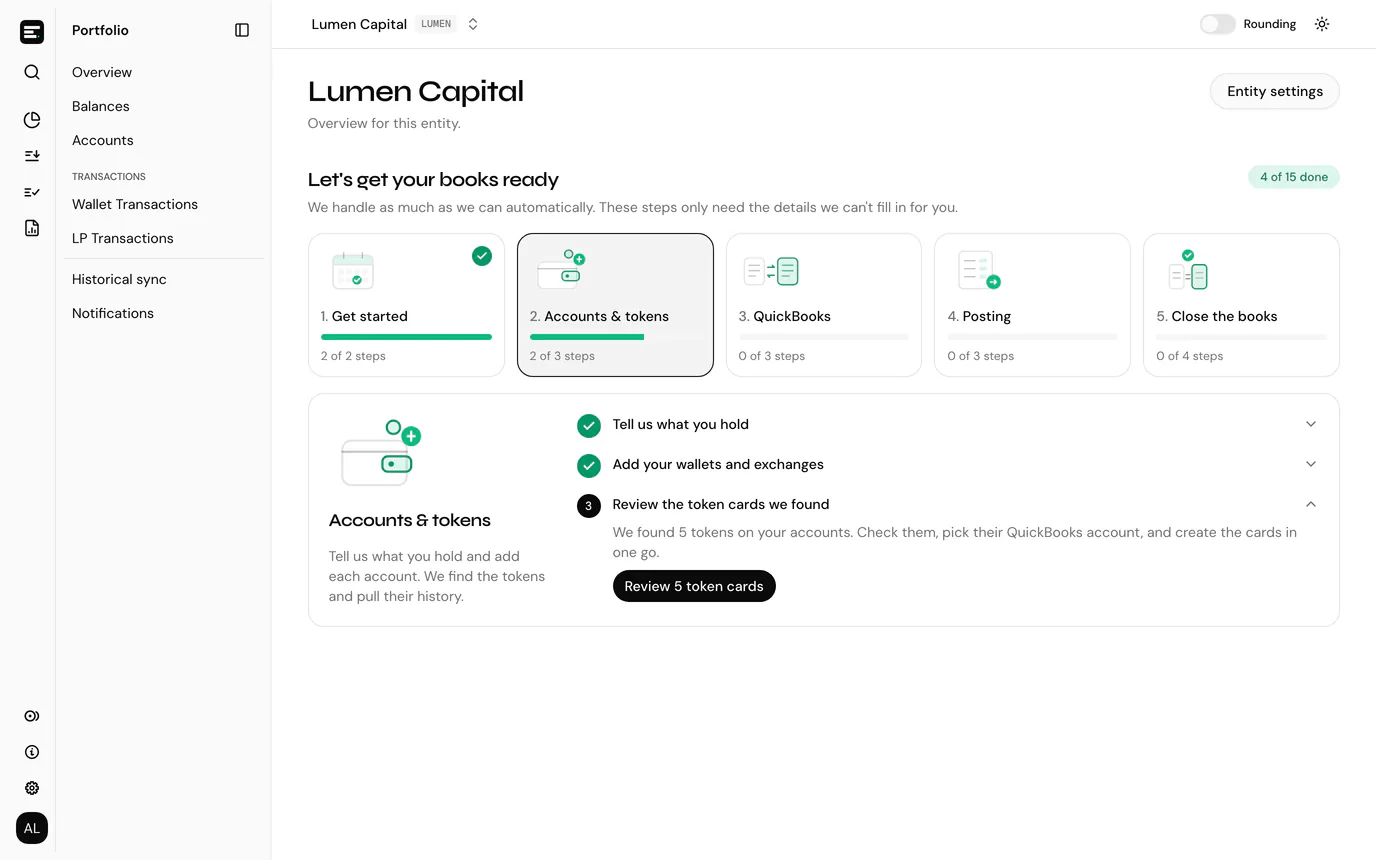
A new entity opens on its home page with a setup checklist. It lists the steps that turn an empty entity into working books (or, for a portfolio, a tracked set of accounts) and shows which one to do next. SimplyLedger fills in what it can by itself, such as reading balances and suggesting token cards, so the steps only ask for what it cannot work out.
Before the checklist: approval
A portfolio entity opens on its checklist as soon as you select Create entity.
A new accounting entity is checked by the SimplyLedger team first. Until then you see Your entity is in review, with three steps:
| Step | Meaning |
|---|---|
| Name created | The entity exists, with its Entity Code. |
| In review | The team has been notified. You get an email when it is approved. |
| Set up your books | The checklist below, once approved. |
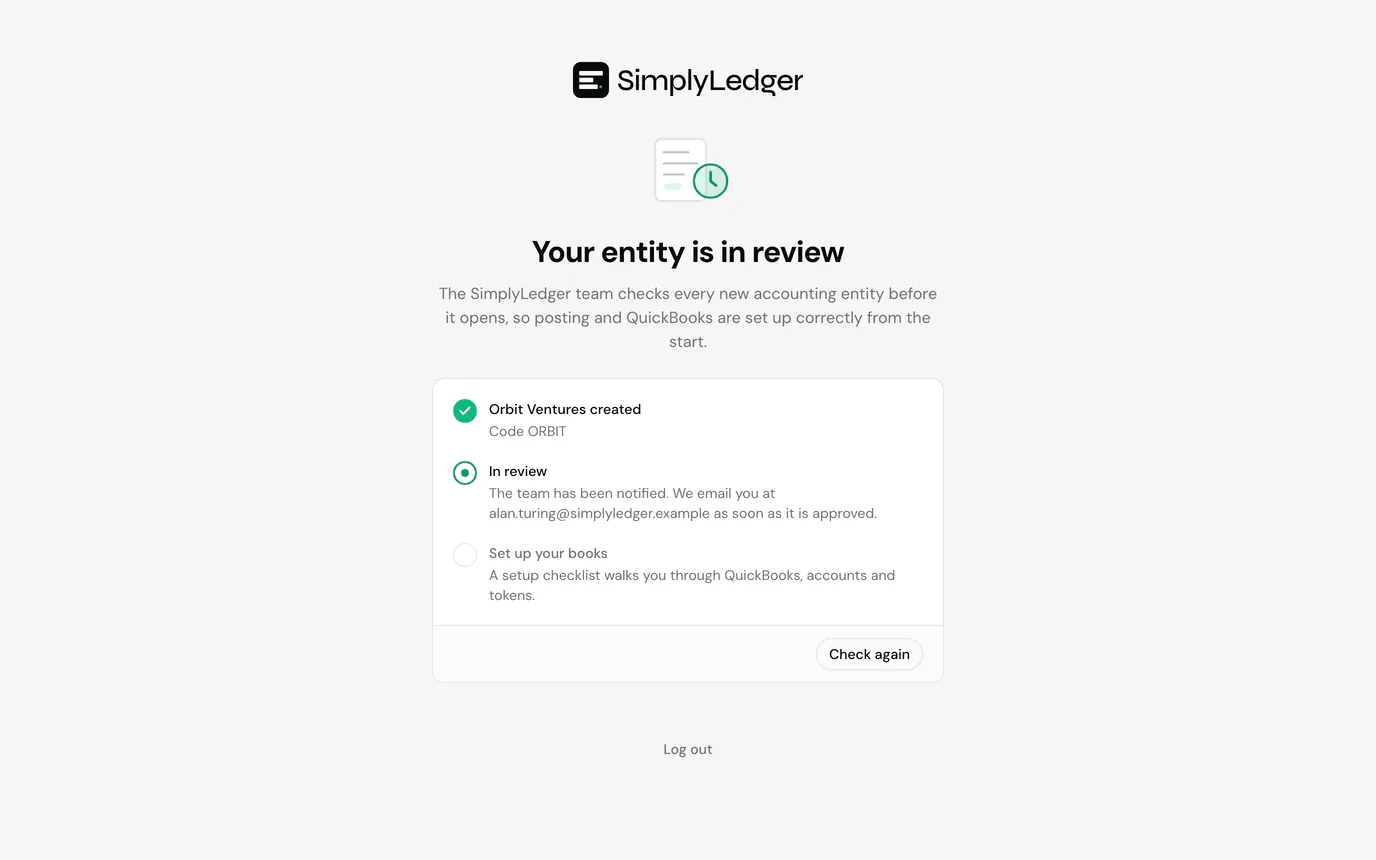
You do not need to stay on the page. If you do, it checks every 30 seconds and opens the entity as soon as it is approved, with a notification that it is approved. Check again checks straight away.
How the checklist works
The heading reads Let's get your books ready in an accounting entity and Let's set up your portfolio in a portfolio one. Beside it, a counter shows how many steps are done out of the total.
The steps are grouped into phases, shown as tiles across the top, each with its own progress bar and a tick once all its steps are done. The phase holding your next step is selected. Select another tile to see its steps.
Inside a phase, each step is either done, skipped, to do or waiting. The next step to do is open, with its action; select any other step to open it. A waiting step tells you what it needs first, for example Available after you connect QuickBooks. Steps you answered with a choice show the choice and a Change button, so you can go back.
Everyone except guests sees the checklist, but only owners and admins can answer its steps.
The checklist disappears once every step is done or skipped, and does not come back. After that, an accounting entity's home page is the dashboard and a portfolio entity opens on Portfolio. Everything the checklist links to stays reachable from the sidebar and settings.
Accounting entities
Get started
1. Decide when to connect QuickBooks. Pick one:
| Choice | What happens |
|---|---|
| Connect QuickBooks now | Turns the QuickBooks integration on and opens the QuickBooks sign-in in a new tab straight away. Token cards get their QuickBooks account and opening balance posting as they are created. |
| Set up wallets first | You add accounts and create token cards first, then connect QuickBooks and link the cards to accounts. |
| I don't use QuickBooks | The books are kept in SimplyLedger only. You can still turn QuickBooks on later. |
This choice sets the order of the rest of the checklist. With Connect QuickBooks now, you set the opening balance date first, then connect QuickBooks and choose how token cards appear there before adding accounts. With Set up wallets first, the QuickBooks steps come after the token cards. With I don't use QuickBooks, there is no QuickBooks phase. The steps that follow wait until you have chosen.
2. Set your opening balance date. Every token card starts from this date. Pick one:
| Choice | What happens |
|---|---|
| Start from today | Balances are read as they stand now and only new transactions are posted. The books start today. |
| Include past transactions | Pick the day the books start under Books start on (1 January of this year to begin with; it cannot be in the future). Each wallet's transactions are pulled back to that date. |
Select Continue. Exchanges and custodians only go back about 90 days from when they were connected, so an earlier date only reaches back that far for them. The date can be changed later on General settings.
QuickBooks
These steps are there unless you chose I don't use QuickBooks.
Connect QuickBooks. Select Connect QuickBooks and sign in to QuickBooks Online in the new tab. The step turns to Connected as soon as you finish, without reloading. If you closed the tab, select Open QuickBooks sign-in again. If QuickBooks is still off, the button reads Use QuickBooks: it turns the integration on and opens the sign-in. If your browser blocks the new tab, use the Connect QuickBooks button on the step instead.
Choose how token cards appear in QuickBooks. Waits for the connection. Pick one:
| Choice | What happens |
|---|---|
| Create accounts for me | Each token card gets its own new QuickBooks account, named after the wallet and token. |
| I already have accounts | You map token cards to accounts you already use. Several tokens can share one, for example USDC and USDT to a Stablecoins account. |
With I already have accounts, the step offers Map tokens to accounts, which opens Token accounts: the account each token books to, filled in on new and suggested token cards of that token.
Give every token card a QuickBooks account. Comes after the token cards exist. It counts the cards without an account; Set up accounts opens Set up QuickBooks accounts, where you link or create an account for each and post their opening balances to QuickBooks.
Accounts & tokens
Tell us what you hold. Select every kind of account the entity has, then select Continue:
| Option | Covers |
|---|---|
| On-chain wallets | Addresses you hold yourself. |
| Exchanges | Centralised exchange accounts. |
| Custodians | Assets held for you by a custodian. |
| Bank & fiat | Bank and fiat cash balances. |
Add your wallets and exchanges. One row per kind you selected, each with its count and its own button: Add a wallet, Connect an exchange, Connect a custodian or Add a fiat account. The kind still missing an account is highlighted. Once a kind has one, its button reads Add another. The step is done when every kind you ticked has at least one account. Import them from a CSV opens the account import for a long list. See add an on-chain account, connect an exchange, connect a custodian and add a fiat account.
Review the token cards we found. SimplyLedger looks for the tokens on each account you add. While it is looking, the step says so and updates by itself, usually within a minute. When it has found some, Review n token cards opens Review suggested token cards. If nothing turns up, add a token card from the account's page instead.
Pull past transactions. Only there if you chose Include past transactions. It counts the wallets that still need their transactions since the opening date.
- Select Request past transactions. Each wallet is indexed in the background.
- Follow it with View progress, which opens Historical sync.
If pulling a wallet fails, open Historical sync and use Request attention to have support look at it. If none of your wallets are on a chain whose past transactions can be pulled, the step says so; select Skip this step to carry on. Skip leaves past transactions out, and Undo on a skipped step brings it back. Posting waits until this step is done or skipped, so the history is not posted with gaps.
Posting
Review your posting categories. The standard categories are already there. Open categories to add your own and choose which count for VAT and cost basis, then Mark as done. The step is also done once the entity has a category of its own. See categories.
Set up posting rules. Rules fill in the category and contra account of matching transactions. Create a rule, or I don't need rules to move on; you can also save a rule from a transaction while posting it. See posting rules.
Post your transactions. Open pending transactions opens Pending and completes the step, since new transactions keep arriving and the list is never finished.
Close the books
Decide on valuation adjustments. Yes, use them turns on Enable valuation adjustments on Valuation settings. No, skip them skips the step that posts them. If the entity uses IAS 38, the step lists any IAS 38 account still to set, with Set IAS 38 accounts.
Run your first reconciliation. Create a reconciliation opens reconciliation. The step is done once a reconciliation is finalised.
Post valuation adjustments. Waits for a finalised reconciliation. Open valuation adjustments (Open remeasurements under IAS 38) opens valuation adjustments. The step is done once one is posted.
Set up cost basis. Every token with a token card, other than stablecoins, needs a cost basis starting point, and at least one category has to count towards cost basis. The step says which is missing.
- Set up cost basis opens Set up cost basis, which gives every token without a cost basis opening balance its starting point in one go: Start from zero, One cost per token (average cost) or Import lots from a CSV.
- Choose categories opens categories, to turn cost basis on for the categories that buy or sell tokens.
- Skip leaves cost basis for later.
Under IAS 38, cost basis cannot be skipped and comes before the first remeasurement, because IAS 38 measures each token from its cost basis.
Review suggested token cards
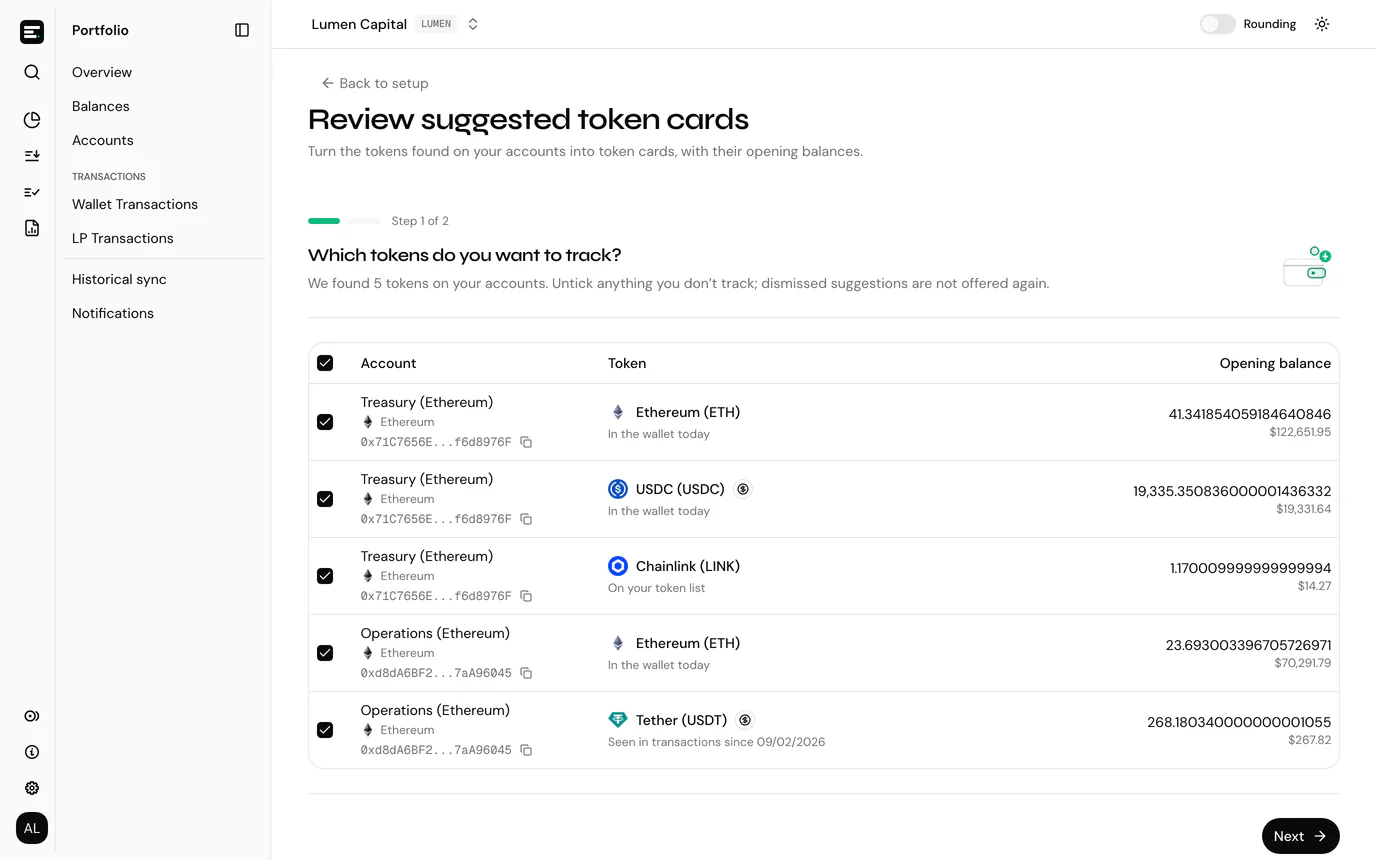
This page turns the tokens found on your accounts into token cards, with their opening balances, in a few steps. Back to setup returns to the checklist.
- When do your books start? Only shown if the opening balance date is not set yet. It asks the same question as the checklist step.
- Which tokens do you want to track? Each suggestion shows its account, its token and why it was suggested: In the wallet today, On your token list or Seen in transactions. Untick anything you do not track. A token worth far more than everything else in the list is marked Looks like spam and starts unticked. Dismiss n unticked removes the unticked suggestions so they are not offered again.
- Check the opening balances. Each balance is read at the close of the day before the opening date and valued in the entity's currency. Change date sets a new opening date and reads every balance again (balances you typed in are cleared). If a balance cannot be read, type it in. If none could be read, select Retry or enter each one.
- Where should each card book in QuickBooks? Only when QuickBooks is connected. Pick the account for each card, or leave it on Create new account. With I already have accounts, tick Remember each token's account, so cards found later are filled in for you to save them as token accounts.
- What do the opening balances post against? Only when QuickBooks is connected. Usually an opening balance equity account. Account for every card sets one for all of them, and any card can use another. Post the opening balances to QuickBooks decides whether each opening balance is sent to QuickBooks.
Next stays greyed out until the step is complete, and the footer says what is missing. On the last step, select Create n token cards. You return to the checklist. If some cards could not be created, the notification names them and they stay listed to fix and try again.
Portfolio entities
A portfolio entity has three steps.
1. Choose the tokens you track. Every wallet and exchange you add gets a token card for each of these tokens, with its balance fetched straight away. The most tracked tokens are listed first. Pick them and select Save tokens. The list can be changed later on General settings. See tracked tokens.
2. Tell us what you hold. The same four kinds of account as in an accounting entity.
3. Add your wallets and exchanges. The same rows and buttons. Token cards and balances are set up for you.
Once all three are done, the entity opens on Portfolio from then on.
Next
Choose an entity covers switching between entities, and entity settings holds every choice the checklist makes.